And I am far from done! I finally got all the patterns traced that I need for my mini-swap. Yesterday the pesky small child slept a good 2 hours so I was able to get 4 items 90% cut out. Still need to cut the linings and interfacing. Both pants are cut so I'm going to start those as soon as I get a chance to sew.
I did actually complete a few things not related this month. I recycled a Hawaiian shirt for ds for Hawaiian shirt day tomorrow. I used one of dh's old ones, even kept the tags and everything. I'll post it later- internet is running too slow right now. I also attached the buttons on my sewing machine! First time I've ever done that. It wasn't too hard, definitely will be doing it again.
I also finished up some random UFOs and parts of diapers (waiting on snaps to finish). I used one of the Made by Mama tags I got from Diaper Diva on ds' jellybean jamma shorts, he was so thrilled. Those have been in the UFO pile since about May. He's worn them to bed every night since, uhm... better do the laundry. ;)
Right now I'm waiting for the plumbers to finish so I can maybe, maybe sew before the baby wakes. Spoke too soon- I'm hearing whimpers. Oh well, there's always tomorrow.
Thursday, February 25, 2010

Saturday, February 13, 2010
Mini-Swap for me
I can't believe its already mid-February, eeck! I had decided that February I would do a mini-swap as part of the Stash Game on Sewing Mamas but alas I did not sign up. Turns out thats a good thing since I've sewn 2 items since the beginning of February, well excluding the 2-3 diapers I finished up.
Still I'm going to work on the mini-swap since I find myself back at my pre-pregnancy weight with little to wear. My pre-pregnancy clothes are winter clothes and it is summer here. My summer clothes are either too big or too small, as my pre-pregnancy weight was still 25 pounds over my ideal weight, which is what I was the previous summer. So I just need a few items to last through about mid-April when the weather starts to turn. Plus I'm nursing so all my tops need to be nursing friendly- I do not do the pull up thing, no way my tummy gets exposed!
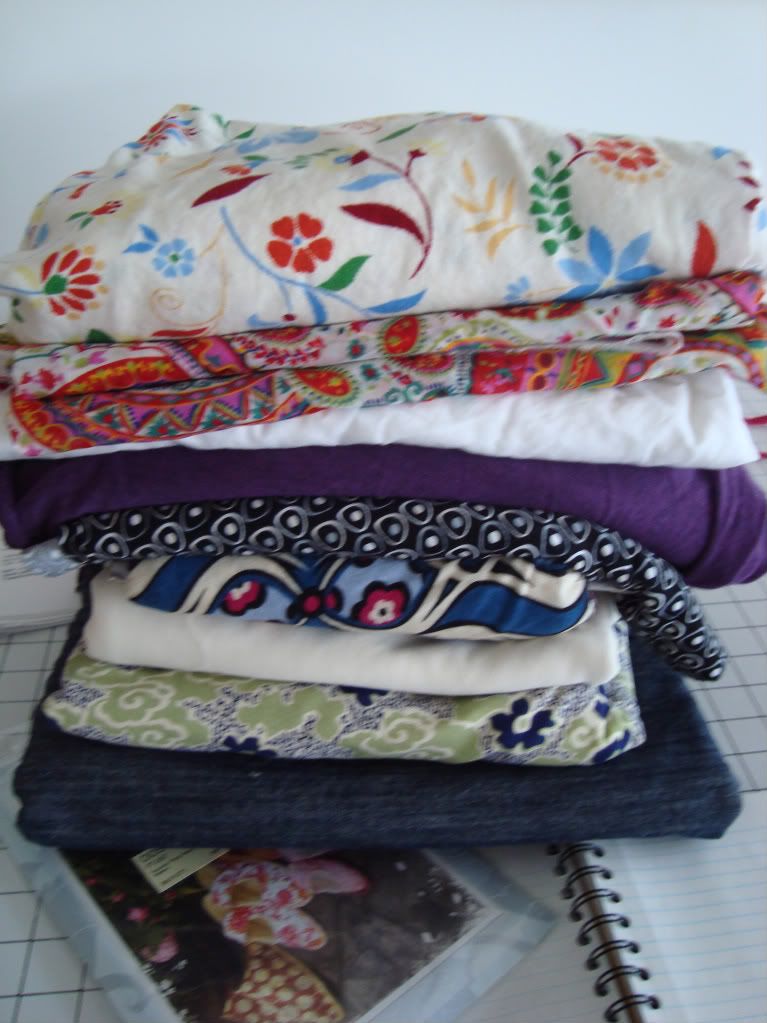
I also have accessories and a UFO on my list but we'll see how far I get. I've already been side tracked a bit with Sophie Tunic for my cousin's baby and I have 2 more cut out, one for my niece and one for my dd. I think I'd better just cut my stuff so that I have it ready to sew when I get the chance. I'll post as I can.
Serger Quilt part 3
I'm just putting in a place holder. I'm sure there's some fancy way to move the post back down so they are all together later but I'll just do this.
I came to a stop on the quilt b/c we moved and its now summer where we are. Knowing DS the minute I finish it he'll want to sleep with it and then he'll be plastered in sweat by morning. Yuck. Excuses, excuses!
I came to a stop on the quilt b/c we moved and its now summer where we are. Knowing DS the minute I finish it he'll want to sleep with it and then he'll be plastered in sweat by morning. Yuck. Excuses, excuses!
Saturday, November 14, 2009
Serger Quilt Part 2
So now we sew it together. I love how quickly serger quilts come together. I'm all about the quick project. Of course, this would have been much quicker if I didn't have two rugrats limiting my sewing time.
I think this is Step 4:
Lay out the strips in the order you want them to be. I put it on my bed and tried to make sure there weren't matching squares across from eachother. Of course I ended up sewing them out of order so I did get two squares the same across from eachother, luckily with the black between them it isn't that noticeable. (No, I was not about to rip out serger stitching to fix it.)

Step 5: Serge quilt middle
For the first seam layer the pieces in this way- backing 1 face up, backing 2 face down, batting, strip 1 face up, strip 2 face down, batting.

Serge it together on one side. Then open up the seam and check carefully that you've serged all the fabric, go back and if you have any holes.


Continue adding the rows- backing fabric face up, quilt, new strip face down, batting
And that is where I am. The middle is serged together. Stay tuned for the next installment.
I think this is Step 4:
Lay out the strips in the order you want them to be. I put it on my bed and tried to make sure there weren't matching squares across from eachother. Of course I ended up sewing them out of order so I did get two squares the same across from eachother, luckily with the black between them it isn't that noticeable. (No, I was not about to rip out serger stitching to fix it.)

Step 5: Serge quilt middle
For the first seam layer the pieces in this way- backing 1 face up, backing 2 face down, batting, strip 1 face up, strip 2 face down, batting.

Serge it together on one side. Then open up the seam and check carefully that you've serged all the fabric, go back and if you have any holes.


Continue adding the rows- backing fabric face up, quilt, new strip face down, batting
And that is where I am. The middle is serged together. Stay tuned for the next installment.
Serger Quilt part 1
 I'm coming out of the wood-work! Seriously been busy sewing, having a baby and trying to sew! Anyway, before this one popped I promised my older one that I would make him a quilt. So here it is, I thought I'd show you all how I made it just in case anyone is interested. Its not done so you'll have to wait to see the finished product. The picture above is just the middle part laid out.
Step 1: cut out squares
The colorful prints were 6x6, I basically used whatever leftover scraps plus a few purchased pieces that he picked out.
The blacks are 6x8, I just didn't want to have to line up any seams. These were all purchase for this project.


Step 2: sew the strips, I serged them then ironed the seams


Step 3: measure your strips, then cut the backing and batting in 6xlength of strips
I used Warm and Natural for the batting and a print cotton fabric for the backing

more later...
Friday, July 10, 2009
Maternity SWAP finished
I finished these up last month but haven't gotten over here to post. Someday I'll actually get more up on this. Anyway, the SWAP was great! I wear most of these clothes all the time. It so fun to have a wardrobe that I created and with everything working together its a no-brainer getting dressed.
Well I'm going to try and put up the reviews on pattern review over the next few weeks so I'll link them here when I do that. Most of the pieces were from Ottobre Women- LOVE that magazine. I even used a few non-maternity patterns and the modifications seem to work!
I'm hoping to do a post-maternity SWAP in the Fall. We'll see how things go.
Friday, May 1, 2009
Burda Style Vintage Bathing Suit- Maternity-ized
Update! 5/9/09 Here are the modeling shots and a quick review. (Sorry about the picture quality, my editing software is on the computer packed away for our move.)
I've actually worn this twice to the pool so far. It definitely is low cut, but more to the point does absolutely nothing to hold the girls in. While I haven't spilled out, its been close so I'm going to go back and see if I can't tighten up the bust. It would be fine if I was just "sunning" or gently "bathing" but I swim with a 4-year-old that feels the need to climb and jump all over me. Other than the bust, the rest is great. With the leg bands the coverage in the rear is great plus the bands are actually really comfy.


So I have actually finished a few things lately. This swimsuit was one of those. I love the way it turned out, no modeling pic as I keep forgetting to take one, I will post it when I take it, promise.
I used Kitty Couture's review/tutorial to help me figure out how to put the suit together. Of course, me being me, had to make things difficult. I had every intention of making this last year but never got around to it. So I really had no idea how it would fit. After looking through BurdaStyle's pics and reading Cidell's review, then decided to jump in anyway.
I started with just basically making the pattern bigger- added 1/2 inch all around and lengthened the torso by 1.5 inches.

Then I decided that I didn't like the crotch being a separate piece and attached it to the front.
 So then I was ready to make it into a Maternity suit. I decided to go with the widening and lengthening plan. I added another 2 inches of length and about 3 inches of width.

So then I cut and of course, I wasn't paying attention so I cut 2 of the bust pieces- you only need one. I did cut full lining for the front and the back.

Here is my new front piece.

I put it together using Kitty's instructions for the most part. The crotch seam I did by layering the back right side up, the front right side down, then the linings on top. That way I got an enclosed crotch seam.
 I loved the way she did the bust so the seam was enclosed so I did that too.


Then I added the straps, definitely should have made these longer as they barely make a knot around my neck. Also the back straps didn't fit- those were definitely too short. In the end it didn't matter since adding the 1.5 inches in length made this suit too high in the back for those straps anyway.
After trying it on I realized that the bust was just too big and baggie. The tab, which I waited to put on until the last, definitely helped but made the suit just a bit too low cut for me. I have to swim with a 4-year-old constantly pulling at me, I didn't think the girls would stay in under those circumstances. So I did have to put a seam in the middle to pull the bust in and then just covered it with the tab. Worked okay, I'm trying to think of a different method for the next one.
Also I had not intended on doing the bound legs but turns out that there just wasn't enough booty coverage for me. So I added the same legs that Kitty did. It actually looks really cute that way. Of course, I if I decide to do it again I'll take some out of the front since there is a bit too much fabric in the front along the legs.
So here's the back. I promise to post a modeled pic soon.

I am definitely planning on making this again. I don't think this version will last me to the end. I still need more tummy room so I'll add more width and a touch more length to the next version. It is really darling in person.
I've actually worn this twice to the pool so far. It definitely is low cut, but more to the point does absolutely nothing to hold the girls in. While I haven't spilled out, its been close so I'm going to go back and see if I can't tighten up the bust. It would be fine if I was just "sunning" or gently "bathing" but I swim with a 4-year-old that feels the need to climb and jump all over me. Other than the bust, the rest is great. With the leg bands the coverage in the rear is great plus the bands are actually really comfy.


So I have actually finished a few things lately. This swimsuit was one of those. I love the way it turned out, no modeling pic as I keep forgetting to take one, I will post it when I take it, promise.
I used Kitty Couture's review/tutorial to help me figure out how to put the suit together. Of course, me being me, had to make things difficult. I had every intention of making this last year but never got around to it. So I really had no idea how it would fit. After looking through BurdaStyle's pics and reading Cidell's review, then decided to jump in anyway.
I started with just basically making the pattern bigger- added 1/2 inch all around and lengthened the torso by 1.5 inches.


Then I decided that I didn't like the crotch being a separate piece and attached it to the front.
 So then I was ready to make it into a Maternity suit. I decided to go with the widening and lengthening plan. I added another 2 inches of length and about 3 inches of width.
So then I cut and of course, I wasn't paying attention so I cut 2 of the bust pieces- you only need one. I did cut full lining for the front and the back.

Here is my new front piece.

I put it together using Kitty's instructions for the most part. The crotch seam I did by layering the back right side up, the front right side down, then the linings on top. That way I got an enclosed crotch seam.
 I loved the way she did the bust so the seam was enclosed so I did that too.


Then I added the straps, definitely should have made these longer as they barely make a knot around my neck. Also the back straps didn't fit- those were definitely too short. In the end it didn't matter since adding the 1.5 inches in length made this suit too high in the back for those straps anyway.
After trying it on I realized that the bust was just too big and baggie. The tab, which I waited to put on until the last, definitely helped but made the suit just a bit too low cut for me. I have to swim with a 4-year-old constantly pulling at me, I didn't think the girls would stay in under those circumstances. So I did have to put a seam in the middle to pull the bust in and then just covered it with the tab. Worked okay, I'm trying to think of a different method for the next one.
Also I had not intended on doing the bound legs but turns out that there just wasn't enough booty coverage for me. So I added the same legs that Kitty did. It actually looks really cute that way. Of course, I if I decide to do it again I'll take some out of the front since there is a bit too much fabric in the front along the legs.
So here's the back. I promise to post a modeled pic soon.


I am definitely planning on making this again. I don't think this version will last me to the end. I still need more tummy room so I'll add more width and a touch more length to the next version. It is really darling in person.
Lots of cutting and sewing- not a lot of finishing!
For some reason I'm on a roll tracing patterns and cutting things out but just am not getting things finished. Urgh....
This is my current UFO list:
1 maternity shirt waiting on hems
1 pj shirt for ds waiting on hems
3 small footie pjs for baby waiting on snaps
1 cool black jacket for niece waiting on snaps
1 diaper cover waiting on snaps
3 embroidered PUL diaper cover cuts needing to be sewn up
1 PUL cut waiting for embroidery
4 diapers waiting for snaps
1 shirt for nephew waiting on hems
1 hoodie for nephew half-way done
2 longies needing elastic
1 wool soaker that will need elastic
1 wool soaker cut
1 pair of maternity pants cut
2 rtw shirts that are ready for inserts (had to let them out)
Ironing board cover needing elastic
Plus I've committed to making my niece 2 onesies, an oval crib sheet and some round pillows to finish her bedroom set. Urgh....
So what do I do? I've signed up for a SWAP!!!!! 12 pieces due June 12th!!!!! So I guess I'll be busy finishing up all these UFOs this week as I can't do anything with my sewing area all cluttered up. Wish me luck.
This is my current UFO list:
1 maternity shirt waiting on hems
1 pj shirt for ds waiting on hems
3 small footie pjs for baby waiting on snaps
1 cool black jacket for niece waiting on snaps
1 diaper cover waiting on snaps
3 embroidered PUL diaper cover cuts needing to be sewn up
1 PUL cut waiting for embroidery
4 diapers waiting for snaps
1 shirt for nephew waiting on hems
1 hoodie for nephew half-way done
2 longies needing elastic
1 wool soaker that will need elastic
1 wool soaker cut
1 pair of maternity pants cut
2 rtw shirts that are ready for inserts (had to let them out)
Ironing board cover needing elastic
Plus I've committed to making my niece 2 onesies, an oval crib sheet and some round pillows to finish her bedroom set. Urgh....
So what do I do? I've signed up for a SWAP!!!!! 12 pieces due June 12th!!!!! So I guess I'll be busy finishing up all these UFOs this week as I can't do anything with my sewing area all cluttered up. Wish me luck.
Thursday, April 2, 2009
Newborn Diapers
So the other thing I've been working on is sewing my own diapers for the new little one. I'm still not exactly sure if I'll follow through but learning how to sew these things has been fun. I started a Flickr photo set for those if you all want to have a look.
MSL's Newborn Diapers
Its just amazing the different combinations, fabrics, patterns and so on that you can use for these things. I guess that's one way to make diaper changes interesting.
MSL's Newborn Diapers
Its just amazing the different combinations, fabrics, patterns and so on that you can use for these things. I guess that's one way to make diaper changes interesting.
Some Ottobre Maternity for me
Yep, looks like our family is actually expanding- well I am anyway!
So these are my first efforts, both from Ottobre for Women 2/2007.
The white top is definitely for the third trimester- I just don't fill it out yet. Of course if I had read the description I would have seen that the model was 36 weeks. But then, to me she looked cute with this little bitty belly. Somehow I don't think I'll be looking like that at 36 weeks.
I had a little trouble with the cross-over but I'm thinking that it will resolve itself when the belly grows.

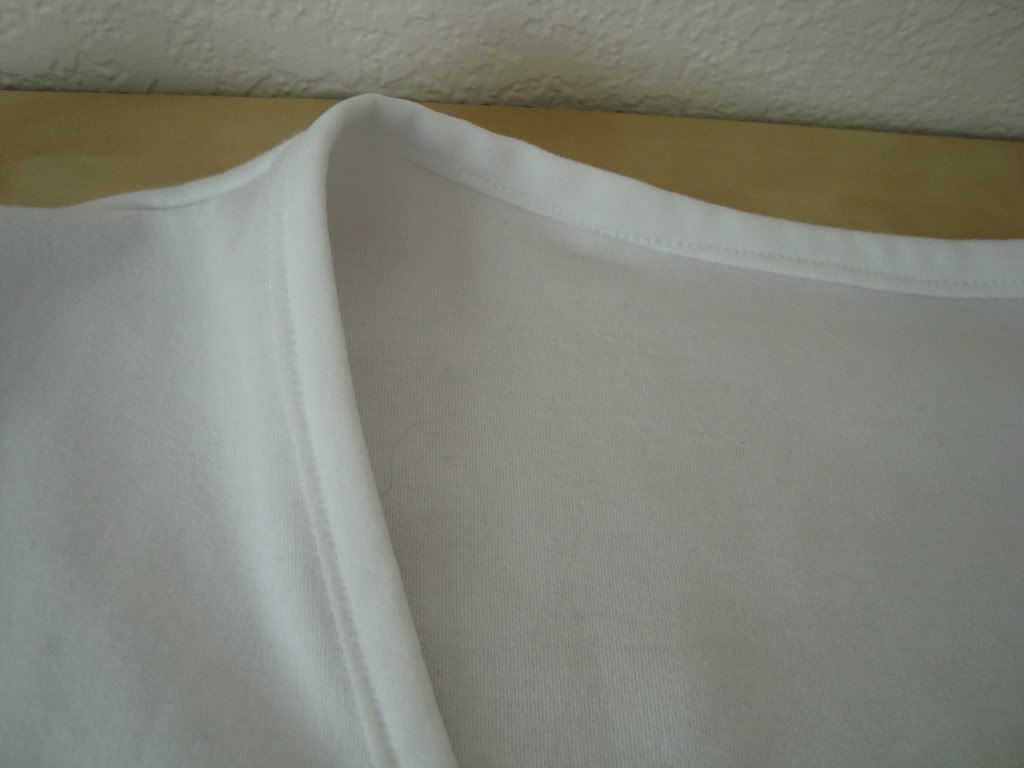
I used some plush FOE for the neck and sleeve bindings. I really was so happy with how it turned out, I have never done this good a job!

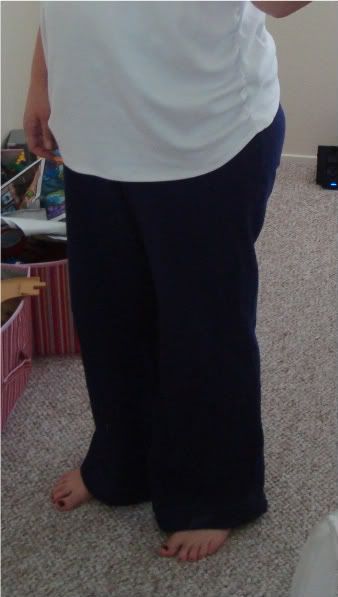
And unfortunately this is the best pic of the pants I got. They are a dark blue linen so I don't think they photograph well anyway. I did them totally plain, no pockets, no frills. I had to make some minor modifications but they fit well. I also made another pair in a khaki stretch twill that I'll post when I get pictures taken.

I have 2 more shirts from the 3/2008 issue cut out so I'll post those when they're done.
So these are my first efforts, both from Ottobre for Women 2/2007.
The white top is definitely for the third trimester- I just don't fill it out yet. Of course if I had read the description I would have seen that the model was 36 weeks. But then, to me she looked cute with this little bitty belly. Somehow I don't think I'll be looking like that at 36 weeks.
I had a little trouble with the cross-over but I'm thinking that it will resolve itself when the belly grows.
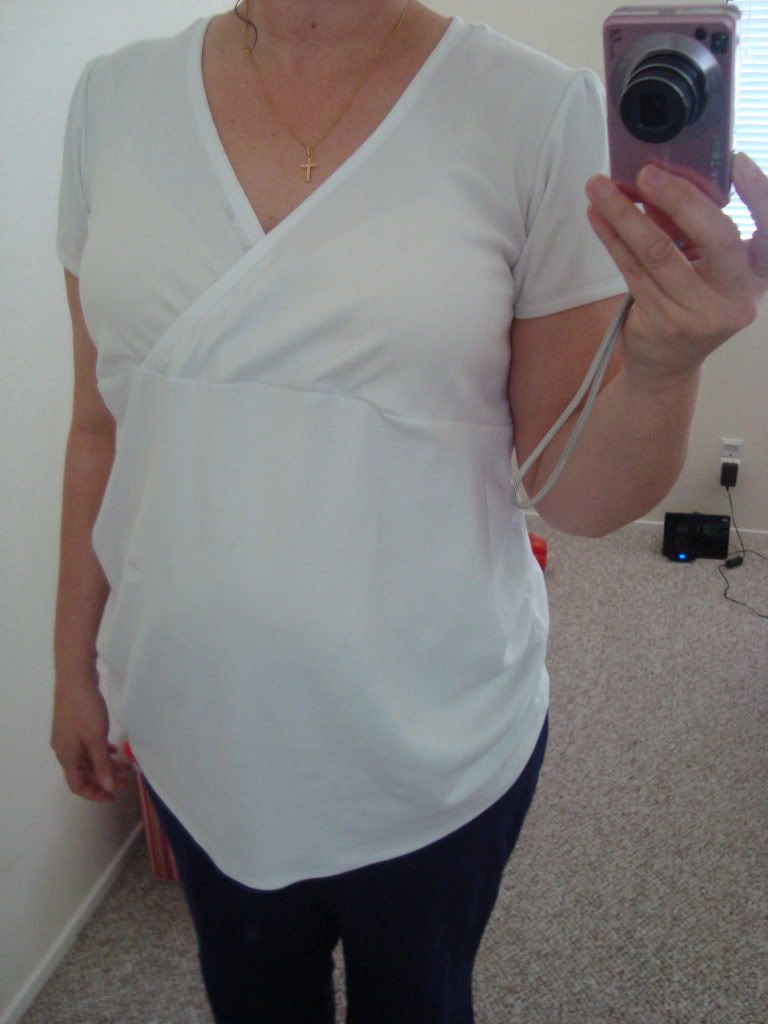
I used some plush FOE for the neck and sleeve bindings. I really was so happy with how it turned out, I have never done this good a job!
And unfortunately this is the best pic of the pants I got. They are a dark blue linen so I don't think they photograph well anyway. I did them totally plain, no pockets, no frills. I had to make some minor modifications but they fit well. I also made another pair in a khaki stretch twill that I'll post when I get pictures taken.
I have 2 more shirts from the 3/2008 issue cut out so I'll post those when they're done.
Some Ottobre for kids
I apologize in advance- the pics are terrible. We moved and I haven't quite figured out where and when and how to take pictures in the new place.
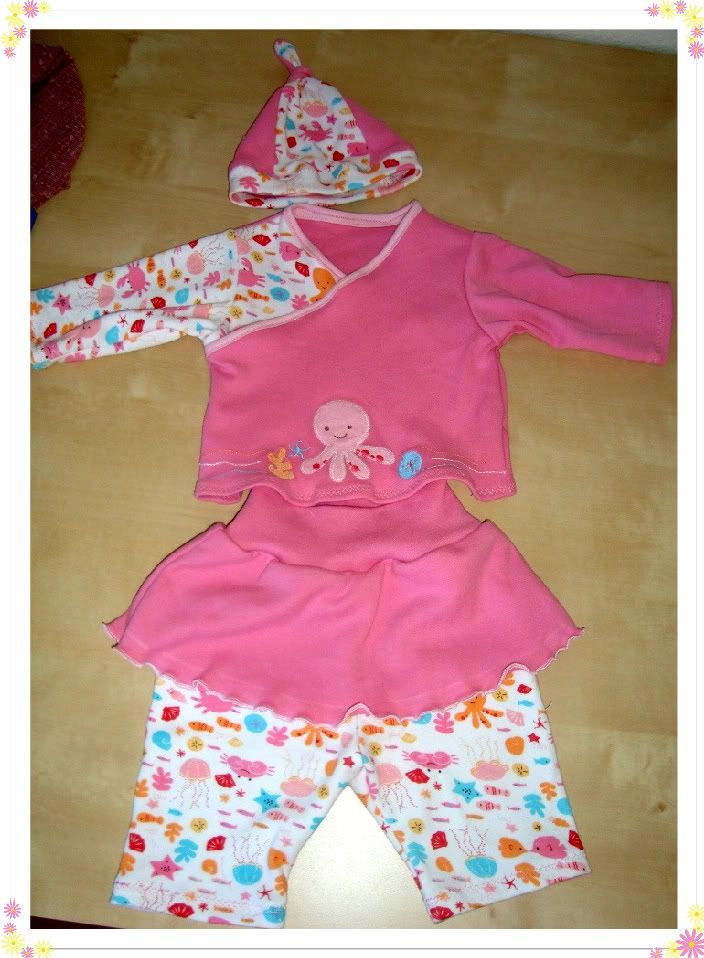
I just got a new niece a month- almost 2 ago- so I did sew up a cute little outfit for her using Ottobre patterns. The top is modified to resemble the New Conceptions pattern everyone always raves about but I can't bring myself to actually buy. This version is great. I used a Gymboree blanket for the fabric.

I also made the bumper, crib sheets, and duvet cover for this little one's room but the pics are not available yet. I'll post those when I get them.
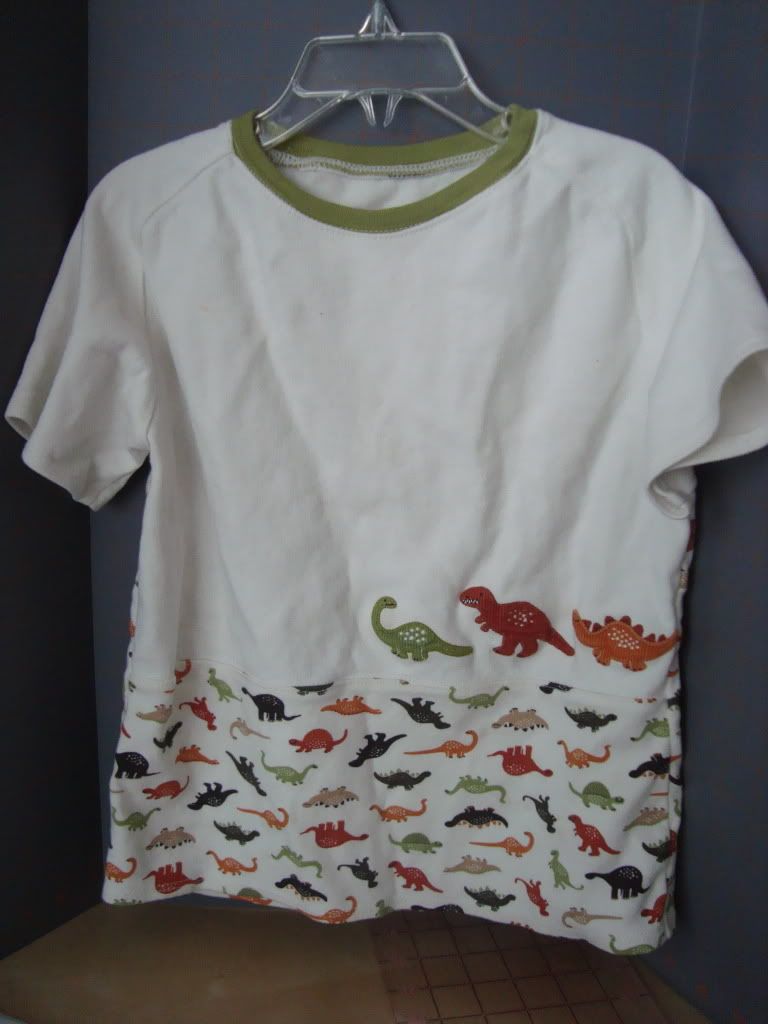
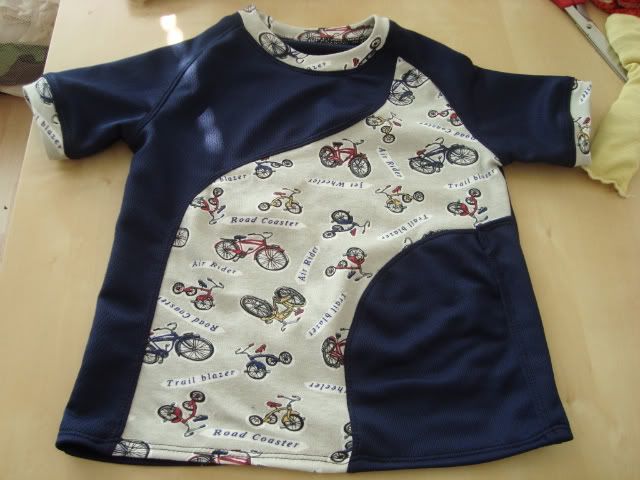
I also whipped up some shirts for ds for preschool this past month. The dinosaur shirt was made from a Gymboree blanket for dinosaur week at school. And the bike shirt was for the St. Judes Trike-athon they just had. I somehow cut a piece of the bike shirt wrong so I did a terrible patch job but it worked, ds loved both shirts.


I just got a new niece a month- almost 2 ago- so I did sew up a cute little outfit for her using Ottobre patterns. The top is modified to resemble the New Conceptions pattern everyone always raves about but I can't bring myself to actually buy. This version is great. I used a Gymboree blanket for the fabric.
I also made the bumper, crib sheets, and duvet cover for this little one's room but the pics are not available yet. I'll post those when I get them.
I also whipped up some shirts for ds for preschool this past month. The dinosaur shirt was made from a Gymboree blanket for dinosaur week at school. And the bike shirt was for the St. Judes Trike-athon they just had. I somehow cut a piece of the bike shirt wrong so I did a terrible patch job but it worked, ds loved both shirts.
Subscribe to:
Posts (Atom)
Season of One Thimble!
Funny enough this Spring has really been the Season of One Thimble (affiliate link). It started off really innocently, I signed up for ...

-
 I'm so excited! And super nervous. If you've been following along with the 6 Degrees of Separation Tour, then you've seen some...
 -
 So the sure fire way to get me back on the blog is to sign up for a blog tour. When Suzanne from Winter Wear Designs asked if anyone was in...