Thursday, September 10, 2015

Cardigan to jump start the Fall

Cardigan season, here we come!  As I may have mentioned before I joined the Capsule Wardrobe Sew Along group on Facebook in the Summer.  Or maybe I haven't mentioned that yet- I think its on the next post I'm working on.  Anyway as part of that group Becca from Freenotion organized a Fall Pattern Showcase.  Loving deadlines, I decided to sign up.  Not sure signing up 2 days after school started was the best plan.  Still I did get some great sewing time after the kids were either loaded up on the bus or I waved to them as they rode their bikes to school.  I actually met the deadline!

Let start with the fabric, I'm working with this lovely hacci that I got off another Fixer on the Facebook Knitfix group.  Not sure what month it was from and it has these gold and black threads running through.  Not too much sparkle, just right for me.  It still will be a great neutral.  It also has this great fringe running out of the selvage.  Fringe is one of the trends for the fall, or so I hear from Get Your Pretty On.


I found this pattern in the 5/2012 issue of Ottobre Women.  The gray one is pictured in the magazine (below from their blog). Ottobre Blog  My fabric is thinner but I thought the square front would be great.  I did have to shorten mine, only had 2 yards of fabric to work with.  Plus with the thinner fabric I think shorter is better on me.  And bonus for me- I had already traced this pattern out, shortened and everything!  I had planned to use this pattern last fall to try to make one of those Bobeau wraps that were all over the place.  I never got around to it.  Maybe this year.  


So back to my project, turns out 2 yards was still a little short- I wanted full length sleeves and came up 3 inches short.  So I added a cuff.


After that everything seemed to come together easily and quickly.  The only "tricky" part is the shoulder/neck seam.  Since the neck is supposed to fold down over the outside you have to stitch right sides together from the end of the shoulder to the top of the neck.  


Quick! 


Looked great until I tried it on.  Eeeeeck!  The whole thing was falling off.  Between the stretch of the fabric and the width of the back it was just not working for me.  I ended up having to make a back  center seam and took out about 4-5 inches.  


I then decided I didn't care for the folding over since my fabric was different on the inside.  I put clear elastic on the neck seams for both shoulders and then down a little farther on the center back seam.  Love how that turned out.  


And now it fits great!  I love it.  I'm sure I'll get a lot of use out if it this fall.  As excited as I was to sew up this cardigan, I was not so keen on wearing outside in the 80 degree, 90% humidity!  For now I'll leave this inside picture and work on some better shots today.  


Check back tomorrow for more on the Fall Style Challenge (affiliate link) and sewing!

Wednesday, September 9, 2015

Bring on the Fall!

Not really, or maybe.  This time of year I get so sick of my summer clothes and, here, it is also the worst time for mosquitos.  So that means I'm ready to start layering up.  My late summer uniform is typically a light weight button up with a tank and shorts.  Pretty much like this- in fact I think I wore this with a black tank top yesterday.


Then at some point that switches to flannel or a cardigan.  I made some flannel shirts last year (Ottobre Women's Issue 5/2012).  In fact I still have one waiting on button holes.  They are great in early fall over tank or tee, then later with a vest or sweater on top.  


Since I have enough light weight shirts for now and its still 80/90 degrees I've decided to start my Fall sewing with cardigans.  Cardigans are great for the Fall and Spring (and for some in the winter too!).  I've avoided cardigans for the past decade due to always having small children around that pulled on my clothing.  Last Fall though, I wore them quite a bit and really loved having that piece I could remove when it got hot, pull on easily when it cooled and just gave you that extra bit of texture or color to complete your outfit.


 The striped cardigan here is actually a men's that I reshaped for me.  The bright pink is thrifted and the third is from the Swoon Cardigan pattern, its a freebie!  While I love that cardigan- I made 2 last Fall and 2 the Spring- its very fabric intensive.  I need 3 yards for my size.  I don't have 3 yards of sweater knit in my stash right now.  What I do have is 2 yards of this wonderful soft hacci with gold and black threads.

Still deciding what pattern to use but it will be from Ottobre.  Off to my sewing room!

Tuesday, September 8, 2015

Revisiting Ottobre

I recently joined the Ottobre Inspired Sewing group on Facebook and have been having so much fun going back to these patterns.  Not only did I already complete 2 pieces from the newest Women's issue, I went back to the first tracings I did for my oldest to make for my youngest.  It seems inconceivable that the baby is big enough to fit into those.  Granted this baby is bigger than his brother was at this age, brother was a full year older (the boys share a birthday month)!

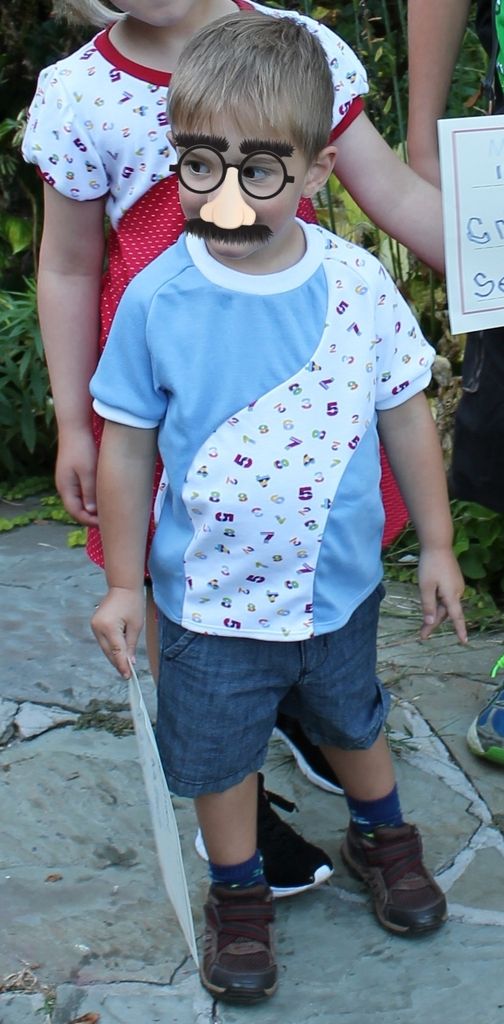
The one that I was drawn to was the color blocked shirt from Ottobre 2/2005.  PDF of Ottobre 2/2005 Turns out that that shirt starts at size 110 but I knew I had made it for my older boy child when he was smaller.   I found this set in my photobucket files, I loved it.  It was the first shirt from this pattern and I want to say I made 5 or 6 more before I moved on to a different pattern.   That was 7 years ago!  It could not have been 110.  Sure enough, I had down sized the pattern to 98.


Well now its the little bits turn to wear the pattern.  I must have overlooked it for the girl child- mostly because there are soooooo many choices for girls.  Boys are more limited.  Anyway, I pulled out the old tracing and went to work on a muslin of sorts.  I figured it would be fine but in the back of my mind there was something I thought I needed to adjust- I couldn't remember what.


Turns out it was too wide for my skinny boys.  I've marked it on the line drawing pdf that I keep in a folder for next time.  It is wearable but I would like it to be a little thinner through the body.  So I took the pattern and carefully folded out 1/2 inch on the front and back.

Perfect fit for the first day of school!

Woo Hoo!  Now that all three monsters are at school, I should really be getting off the computer and enjoying my quiet house.

Monday, June 22, 2015

Finished Sis Boom Jamie Dress

I really cannot believe this is the fourth time I've made the Sis Boom Jamie Dress and only the first time I made the dress.  Its fantastic!

I've hesitated making the dress mostly because of the gathered skirt.  I don't like to add more fabric to my already thick waist.  When I've made the pattern as a top, I've always done an a-line style that works pretty good for the short length.  I wasn't convinced it would work as well for the full length dress.  It might but I wasn't willing to try it.  Then of course is the reality is I do not wear dresses too often so the top is really a great use of this pattern for me.

Okay, still I've always wanted to make the dress.  I decided to do so for my daughter's baptism this past weekend.  I did end up modifying the pattern in three ways.  The first, of course, was to use a half circle skirt instead of the gathered skirt from the pattern.  I was planning on a full circle but did not have enough fabric for that.  I used the Circle Skirt Calculator on the by Hand London blog.  Fantastic!

I also shortened the midriff, but went a little too far.  I think I'll lengthen it next time.  It hits just a little to high for my figure right now.  It was too long before so somewhere in the middle should be just right.


The last alteration I made was to use the back bodice and waistband pieces from the Carolina Mae.  I did this because I found that my bra showed no matter what I did in the back of the Jamie and I just do not like wearing a strapless bra.  I wanted to cut it on the fold to keep the zipper on the side so I took out 1/2 inch from the center seam, added it to the side seam and cut on the fold.  You can probably skip that if you wanted to but I also wanted the straps a little farther in so it worked better for me to do that.    


I'm in love with this dress and now have to push my husband to take me out!

Friday, June 12, 2015

Summertime!

Sewing in the summer always seems more fun somehow.  Or maybe I'm just using it as an excuse to escape the heat and stay in the Air Conditioned house!

I've actually been sewing quite a bit and will share more soon.  Today I'm just sharing my Sis Boom Jamie/Carolina Mae mashed up muslin for the the dress I'm going to make for dd's baptism a week from Sunday!


I love how it turned out.  I used an embroidered white cotton from JoAnns.

I struggled a bit with it the top.  The Jamie front is an XL with regular bust for the top, the waistband is 1X and the skirt is self-drafted, very poorly though.  The Carolina Mae back is size 16 with added length and self-drafted skirt.  I also modified the back to have the zipper on the side as I like to dress myself most days.  All those sizes are per my measurements.  I did find the Carolina Mae to be too big.  I've printed the 14 for the next round.

I started with a longer skirt and just kept pinning it up until I got the length I wanted, which turned out to be 8.5 inches, plus 1 inch hem and .25 for SA in the front, 7 inches + 1.25 for the center back.


Oy!  The zipper makes me so mad!  It looks fine but I had to pull the original invisible zipper that looked better out after breaking the pull twice!  It was one of those make your own so when the first pull broke I was able to take a second pull and jimmy it onto the zipper.  Unfortunately it also broke.  Urrrrrrr... so I just pulled the zipper off and used a standard zipper.  Its not too bad since its under my arm.  

As you can see in the picture above, the skirt was a little too tight.  So to make the top wearable for now I just added little triangles to both skirt sides.  It worked and will have to do until I decide if I want to make another top.

See how nice and straight that hem is front to back.  I was pretty happy with that.  But you know, the back skirt is a good 3+ inches shorter than the front.  Guess that's what a belly and a sway back do for you.


I've already worn it with my new Iris Shorts and love it.   Definitely see a lot of wear out of this.  Now to buckle down and make the dress.  Wish me luck.

Wednesday, June 3, 2015

Copy Cat Patricia

So I was getting out the Patricia pattern the other day, and checked out all the changes I made for the January Challenge.  Can't wait to sew up the new one.   It should be perfect.

Of course that made me realize I'd never blogged the final week- the Copy Cat version.  Yes, I know its June but hey, its my blog, so whatever I want!

The final week of Just for Me January was to Knock it Off.  I chose this gorgeous dress from JCrew.


you can see the rest of the collection here- J.Crew Spring and Summer 2015

Anyway, my inspiration was wonderfully beaded and decorated but I wanted to use the inspiration for a swim coverup.  Something much simpler.  So I chose a floral voile fabric I found in the Red Tag Section of JoAnns.


The inspiration had a cut on sleeve or dropped shoulder thing going on, I decided to do the cut on style for simplicity.  I took the shoulder seams and drew them out.  


Easy peasy.  Then I cut the floral pieces out and skinny-ed up the facing to match the inspiration.  


I used the pockets from the nightgown Patricia.  I topped the with some white fabric and ta-da, my Knock-it-Off!  


While I do love it, its a little more mumu than chic dress.  Oh well.  I am planning to add elastic to the back to shape it a little bit.  Hopefully that looks better otherwise it will end up as another comfy nightgown.  


Tuesday, February 3, 2015

Comfy & Cozy Patricia

This week's Patricia is my favorite so far.  It really is Comfy & Cozy!  I made a nightie with easy access for nursing and pockets.


I adjusted the pattern back a little more to narrow it.  No picture for some reason.  I basically cut the pattern across the back about 3/4 of an inch below the armscyle, then took 1/4 inch off the fold and redrew the side to match.

I then added a shirt tail hem on both front and back.


For the pockets I just folded the side pieces at an angle about 12 inches from the bottom.  I made a fancy top for the pockets but didn't photograph it.  I'll add the picture to my next post since I used the same style pockets for the Knock off.


My little one still nurses before bed and in the morning, so I needed the nightie to have access.  I just did the same as I'd done with my original Patricia- lengthened the front opening.  This time I used elastic for the button closures instead of ties.  Works really well.


I added the elastic as I was sewing the facing so the ends are between the facing and front fabric.  You can see the elastic under the facing in the pic with my hand.  I sewed the front facing opening along that side only, then cut it apart and sewed up the other side.  


I did 3/4 sleeves only because that was all I had left of that fabric- thats also why I color blocked instead of made it fully patterned.  I put knit on the cuffs of the sleeves to make them extra comfy.

Adding a modeled shot- sorry for the wrinkles I've been wearing it to bed.  


And the back- definitely a better fit than the first.  


Season of One Thimble!

Funny enough this Spring has really been the Season of One Thimble  (affiliate link).  It started off really innocently, I signed up for ...